Author Archives: nuisance26

About nuisance26

I'm a married mom of three kids and a frugal crafter.

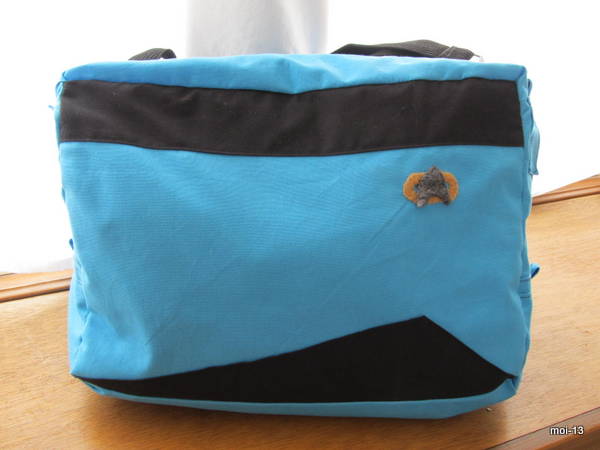
Star Trek Bag

Standard

I recently took a trip across the country and flew for the first time in 12+years. I’m not deterred by terrorists, I just happen to hate the whole confusing process in airports and the few flights I took as a teen were less than ideal experiences. :/ Anyway, to combat pre-flight anxiety I decided to do some sewing.

IMG_2573

This bag is really just a prototype so don’t critique it too harshly. ๐Ÿ˜›

I went with blue and black to mimic the early uniforms in Star Trek Next Generation. If I worked for the Federation in a Sci-Fi future, I’d almost certainly be on the Science/Medical team. ๐Ÿ˜€

The badge is Voyager style with a rectangular, rather than oval base. Although, from the way the bag ripples and scrunches it appears more oval in the photo. It really is a rectangle!

I used a recycled pillowcase, zipper and straps for the bag. The blue canvas was new.

IMG_2574

When I saw it was turning out fairly decent I decided to actually take it on my trip as my personal bag. So I added a few quick elastic pockets to a semi-lined interior.

IMG_2575

So yeah, it’s cute and all but I will be ripping it apart fairly soon. I hate the zipper and unfinished interior.

It was totally worth spending the $2 on sale canvas and the 3 hours to whip it up though. I felt pretty special carrying it on my trip. ๐Ÿ˜‰

Nintendo Powerstar Plush

Standard

This has to easiest toy to make for any Nintendo fan. Cut two simple star shapes with rounded points from fleece and make two long oval eyes from felt or fleece. I didn’t spend more than 20 minutes on this and it was a big hit with my daughter.

I took this picture after a month of play and it’s holding up nicely.

IMG_2524

Pokeball and Thomas Train Pillowcases

Standard

Every year for my kids’ birthdays, I sneak a bit more reusable or cloth wrapping into their gift pile. I wouldn’t move away completely from having them tear and toss any paper, that’s part of the fun, but I do aim to keep it at least 50% reused wraps or fabric wraps. So besides the assortment ofย  twice used, thrice used and who knows how many times used gift bags we wrapped in I also made a few special wraps this time. It was especially handy since the items I needed a cloth wrap for were sleeping bags. Thus a pillowcase to match was ideal as a wrapping.

For my son I purchased a somewhat holey Thomas and Friends fitted twin sheet at Goodwill for $2. It was a bit tricky planning the case to avoid the holes in my material but still include every printed character. His sleeping bag of course was blue.

IMG_2502

For my daughter, to keep with her Pokemon/Nintendo theme, a red sleeping bag was the obvious choice. I only needed to decide whether to emblazon the case with a giant M for Mario or piece together a Pokeball scheme. I decided to go with a Pokeball scheme since I had extra time that day and not too much in the way of red fabric.

The idea behind the Pokeballs was that with a vinyl circle where the button should be would act as a window to insert Pokemon cards or print-outs to have an ever-changing sham. The circles are sewn onto the pillow in a U shape, leaving the top open for card insertion. As of right now, my daughter has Hippotatas, Lucario and Pink Shellos in her case. I figured this would be a way to keep up with her desire to acquire more Pokemon without actually having the expense of buying them, the time of making them or the burden of owning and organizing them. Having more Pokemon is as cheap and simple as printing a picture from the internet and slipping it in the case.

IMG_2521

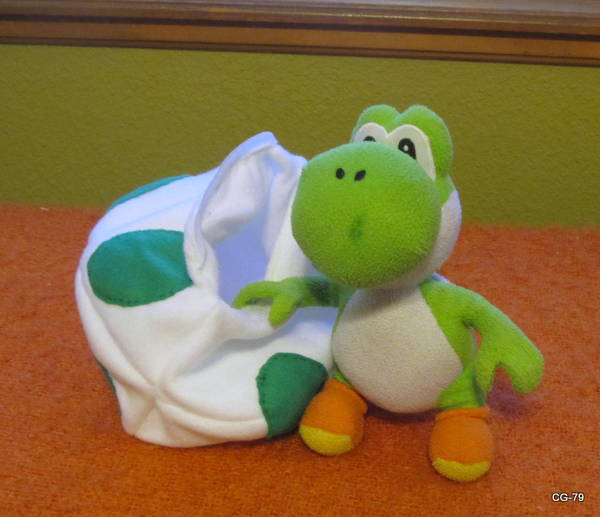
Plush Velcro Yoshie Egg

Standard

IMG_2518

I’m so glad my daughter likes stuffies because they are fun to make. This one almost kicked my tushie though as I made over 4 prototypes before hitting on the best proportions. I don’t know why it’s so easy to make a ball but so hard to make an oval. At least, hard to make an oval that doesn’t resemble a football anyway.

I had to make it big enough to encase any of her collection of 7″ Yoshi plushies and a way to keep them in. I decided on hook & loop tape over a zipper in this case. It seemed easier and I didn’t have a white salvaged zipper in my collection anyway. ๐Ÿ˜› The egg is fully lined to add more stability to the thin fleece. It would have been nice to find a lighter green fleece but I have one fabric store within 20 miles of my house and that’s the dinky section at Walmart. I have to take what I can get, especially when I only need a fraction of a yard. ๐Ÿ˜‰

IMG_2519

Toys really are fun to make and extremely frugal, I think, from fleece. This item only cost $1.10 total to whip up(lightweight fleece at $4yd and I have some leftover). Fleece is especially nice to work with since it doesn’t fray like crazy, is easy to needle and forgiving because of the fabric stretch in the finished item. Handstitching a toy is so calming to me. ๐Ÿ™‚

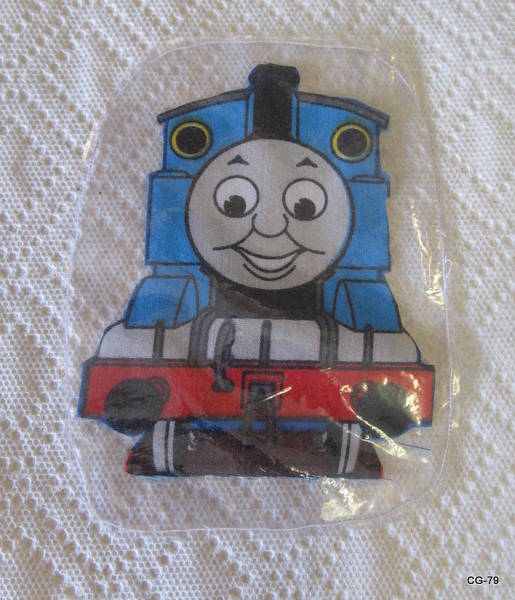
Thomas Fabric Cake Topper

Standard

I probably mentioned this before but two of my kids and myself have birthdays three days in a row in December. Even with extensive planning, trying to make the most of the kids’ days while still enjoying mine is a bit overwhelming. Every year I keep trying to make it easier and less stressful for me. So when my son again requested a Thomas birthday cake I immediately knew I was not going to spend hours decorating something. My foray last year into the more “simplified” decorating plan of using a character cake pan(Lightening McQueen) wasn’t the easier choice I thought it was going to be and not something I wanted to repeat. I have a finite amount of hours and I’d rather spend them enjoying him as he enjoys his day rather than dealing with frosting.

So I had the idea to make a vinyl-encased cake topper. Basically I bought a patterned sheet at Goodwill(for $2 and made two items out of it)and close cut a Thomas character from the fabric. If I had had some fray stop it would have been nice to use it but I’m rather cheap about buying supplies so none of that stuff here. ๐Ÿ˜‰ I then cut two squares of vinyl. I had purchased a roll of high quality clear vinyl at Walmart years ago with the intention of making removable covers for our sunroom screens to keep the room more comfortable in the winter but I never got around to it before we moved. Anyway, I washed my squares of vinyl and then sandwiched the fabric between and sewed around it and cut outside the seam line. I was trying for an oval but since I was in a hurry I failed at making it very oval-ish. It didn’t really matter though since I layed the fabric decoration on my iced and raked cake and then piped a wide shell border around it over the stitched edge so that it was a true oval and around the borders of the cake. I then sprinkled the piped areas with blue colored sugar and surprised myself with how impressive it really looked. It was easy enough(with a circle cake)to slip the knife under the decoration to cut slices so that we could enjoy the look of it longer than simply removing it altogether to cut.

And I thought I had a picture of the cake decorated but alas I do not see it on my data card. Oh well, you will have to use your imagination. ๐Ÿ˜‰

IMG_2522

These have the added fun of being reusable. Simply wipe off with a soapy towel and dry. Paper and print-outs from the computer could also be used instead of the fabric to get exactly what you want.

Pokemon Toys: Ash’s Hat, Pokeballs and Rattata

Standard

Here’s a little something I made for my daughter’s birthday in December:

IMG_2517

My 8 year old absolutely loves Pokemon! Now she can really play trainer with an Ash Ketchum hat, zippered Pokeballs and a Rattata. She has other Pokemon toys to play with as well but this and a tiny Victini from Hong Kong are the only two that will fit in the balls. She’s satisfied with that. ๐Ÿ˜‰

The hat was simply a Goodwill buy and it was actually new with tags still on for $2. I used some cheap fleece to cut a semi-circle for the front and hand-sewed it on. The C was just freestyle and very easy to do and also hand-stitched.

The Pokeballs were simple to figure out since I’d made fabric toy balls in the past. These however were lined and needed to have a zipper so that a small Pokemon toy could fit inside. I used two salvaged zippers from clothing items and cheap fleece from Walmart. As you can see, the button accents are different on the two balls because I wasn’t satisfied with how the zig-zag stitched edge of the first turned out. The black wasn’t bold enough for me so I made the second button with a black fleece backing.

Rattata was something my daughter has been asking for for two years. As far as I know, there has never been a plush Rattata toy manufactured so I resorted to altering an online pattern(found here:http://www.allcrafts.net/crochetsewingcrafts.htm?url=sewingstars.com/mousepattern.htm ย  )to make this one. Alterations to the pattern included enlarging the ears(which I did make too big really), adding little felt claws and whiskers and freestyling the eyes to more closely resemble the Pokemon. It isn’t a fantastic facsimile but my daughter knew exactly who it was and was thrilled. That’s good enough for me. ๐Ÿ™‚

Simple Hobo Drawstring Backpack

Standard

I’m going to be making at least 60 of these bags for a women’s event in March. I wanted to be sure my concept size would be appropriate for holding a full sized folder, Bible, water bottle and a few personal items before I made all of them so Iย  whipped up just one. Luckily, my prototype was perfect!

In a nutshell, I cut a long rectangle 13X36 inches. I folded the rectangle right sides together and pressed down 1/2 inch on the 13″ sides.

Then I folded it again 1 inch and pressed again. Repeated for the other 13″ side.

Now, the top part will be the casing for straps so if I was using a t-shirt I could leave the edges raw. However, this is woven cotton. So I unfolded my presses and pressed in 1/4 inch on each casing end then redid my folds so that the raw edge was hidden in the casings.

Next I stitched the casings in place. Then I stitched together the upper bag sides with my regular machine. I switched over to my serger at this point and finished the sides. After turning right side out, I stitched two dime sized circles on the bottom corners through both layers of fabric.ย  This was stay stitching for where I threaded through the straps in the last step. Alternately an eyelet could be used but that would raise the cost and not look as “hobo” as I wanted.ย  I used a seam ripper inside the circle to create a 1/4 inch gash. Then I cut two strips from cotton jersey, 2″ X 60″ each. T-shirts could have been recycled for this at a slightly lower cost but yardage was more convenient for making so many bags. Jersey doesn’t have to be finished and it very comfortable for weight bearing straps. Using a safety pin, I threaded one strap through one side of the casing and all the way around and out at the same side it was inserted. I did the same with the other strap on the other side. The last step was to pull the strap ends through the backpack gashes and tie knots to secure. Strap length is easily adjusted by trying on the backpack and pulling the straps to cinch. Then just retie the knots higher and trim the excess.

I will try to add pictures for these steps as I work on more bags in the next few weeks. ๐Ÿ˜‰

Girly Initial Bolster Pillow

Standard

One of my little nieces had a birthday earlier this month, her 5th. She’s just about to move into a new house complete with her own super pink bedroom. Renovations are almost complete. I thought she’d love something special for her new room. I found the sweetest little pillow on Etsy but I knew I could make something similar for much less than the $25 price.

Here’s what I came up with:

The pillow is 6X14 inches. I wanted it to be washable so there is an inner removable pillow. My 6 year old helped me make that. The pillow can be removed from the back . I made the back with a sham opening.

I know you’re supposed to completely hide the webbing of the ball fringe in the seam but I preferred the lacy look the webbing gave. After I looked at the completed pillow I regretted that I hadn’t done it the “right” way though. Oh well, I gave it to her as is but will remember to completely hide the webbing next time I work with ball fringe despite what that little impulseย  tells me.

This was about a 2.5 hour project. I spent an hour just on the applique. But the savings was worth it. This project came in at under $2 in materials. Of course, I just used stuff in my stash but the value would have been around $2. ๐Ÿ™‚

Sweatshirt slippers

Standard

I needed a new pair of slippers super fast so I decided not to dig out my Mary Jane slipper pattern but instead, use a simpler, elastic style. Prudent Baby has some great directions on how to put your slippers together.

I used an old sweatshirt for mine and used plain sweatshirt for all the pieces, even the “batting”.ย  The bottoms will probably wear out pretty fast because of that but I wanted something especially snuggly. ๐Ÿ˜‰

These can be made for just the cost of your thread and two pieces of elastic(about $.15)as well as about 30 minutes of time.


A sweet toddler top

Standard

I made this top for my one year old from a pattern and tutorial posted at Prudent Baby.ย  Despite following all the sizing to print directions, my top came out very tight for a 12-18 month sizing. So she only wore it once to a party. At least it was made from a $.10 yard sale pillowcase. ๐Ÿ˜‰ And it was super fast and easy to make!